


In the world of tabletop RPGs, one of the most intriguing paranormal horror games out there is Candela Obscura, published by Darrington Press. Developed by the team behind Critical Role, this game is known for its eerie mysteries, arcane horrors, and fast-paced storytelling.
I first saw Candela Obscura’s character creation process as sort of the prequel to one of Critical Role’s Candela Obscura podcasts. I was struck by how simple it is–and yet the characters it produces feel deep, interconnected, and fully embedded in the world.
If you’re already familiar with the game, you’ve probably found a game to play on Start Playing and just need to make a character. Feel free to jump ahead. But if you’re new, let’s quickly cover what Candela Obscura is all about.
What Is Candela Obscura?
The name Candela Obscura refers to both the game and the secret society within its world.
The setting is the Fairelands, a fictional world experiencing rapid industrialization, scientific breakthroughs, an increase in spiritualism, and a cultural explosion—similar to our early 20th century. On the surface, everything looks bright and full of possibility. Beneath that, however, eldritch horrors and occult forces lurk in the shadows.
The society of Candela Obscura is dedicated to investigating and combating these supernatural threats, protecting an unsuspecting public from the horrors creeping ever closer. As a player, you take on the role of an Investigator—a member of a small, tight-knit Circle working together to uncover mysteries, survive terrifying encounters, and fight back against the darkness.
How to Create a Candela Obscura Character
Character creation happens in eight steps, though your Lightkeeper (GM) may guide you through them in a different order—especially if your group builds characters together.
To follow along, you’ll need either the Candela Obscura Core Rulebook or the free Quickstart Guide. You can download character sheets from Darrington Press or use a digital sheet on Demiplane’s Candela Nexus.

Step 1: Choose Your Role and Specialty
Your Role is what you bring to the group. The Face, for instance, will often be the group’s spokesperson.
You could think of Specialty as the character’s job or occupation–but it’s better to think of it as “the type of thing the character is skilled at”. Confused? Let’s take a look at them. There are 5 Roles with 2 Specialties each, so you have 10 options to choose from--and whatever your imagination makes of them. Do note each role has only one specialty listed in the free rules, so I won’t be listing all the specialties here. You’ll need to purchase the Core Rulebook to see everything available.
The Face – Charismatic, confident, and often the group's public voice.
- Journalist: Skilled at interviewing, gathering and piecing together information. (Primary Drive: Cunning)
- Magician: A talented entertainer and illusionist, comfortable on stage and in front of others. Primary drive: Intuition. *The Magician is not available in the free rules.
Ok, let’s take a step back. Remember I said that it’s better to think of these as a type of job? So if we open this up, we see even more things that your character could do with the same skills:
- Journalist: writer, researcher, legal journalist, analyst, political aide, public relations, social worker
- Magician: actor, circus performer, party entertainer, stunt man, lounge singer, con artist, escort
Here are the rest of the specialties in the free rules:
The Muscle – Tough, physical, and ready for a fight.
- Explorer: Brave and skilled at navigating dangerous situations. (Primary Drive: Nerve)
The Scholar – A seeker of knowledge, whether scientific or academic.
- Professor: A dedicated teacher, skilled in research and analysis. (Primary Drive: Cunning)
The Slink – A shady character who knows how to bend the rules.
- Criminal: A rogue, trickster, or someone with underworld connections. (Primary Drive: Cunning)
The Weird – Someone attuned to the supernatural.
- Occultist: A student of the arcane, well-versed in the unknown. (Primary Drive: Intuition)
Step 2: Assign Action Points

Actions determine how many dice you roll when attempting something risky. More points mean better odds of success.
Mary wants to search a room for clues. She only has 1 die in Survey, so she’ll only be able to roll 1 die. Better hope it rolls high.
If she was trying to use Sense instead, she’d roll 2 dice and take the highest one as the result.
Your Specialty grants you five Action points automatically (listed in the rules). After recording those:
- Choose 1 Action with no points yet and give it one.
- Distribute 3 more points as you like, but no Action can go above 2 at character creation.
Step 3: Assign Drive Points
Drives represent your deeper strengths—the reserves you tap into when things get tough. They are a limited resource that you can use to add more action dice to your roll. Drives are spent on a 1 drive to 1 die ratio.
If a character has 1 point in an Action, the player can only roll 1 die for that Action. By spending a related Drive point, they can add 1 more die to the roll, increasing the chance to get a higher result.
If Mary is chasing a suspect across rooftops, she really needs to succeed on her Move roll–or she could fall and let the suspect escape. Unfortunately, Mary only has 1 point in the Move action. She decides to spend two Drive points to get 2 extra die for the roll.
There are three types of Drives:
- Nerve: Endurance, resilience, and sheer determination.
- Cunning: Social awareness and the ability to influence others
- Intuition: Instinct, perception, and supernatural insight.
Your Specialty grants 3 Drive points automatically. You’ll then distribute 6 more, however you like. Be sure to use something erasable to fill them in.
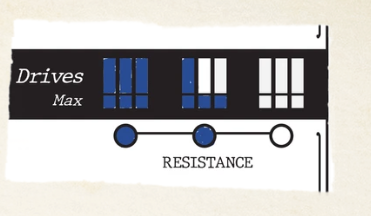
Step 4: Determine Resistances
When things go south, Resistances let you reroll dice. For every 3 points in a Drive, you gain 1 Resistance in that category. Mary has 6 Nerve, so she gets 2 Nerve Resistances.
A player can only reroll as many Action dice as they have points in that Action.
All 3 of Mary’s dice roll badly. Now she can choose to use Resistance. But even though she has 2 Nerve Resistances, she can only reroll 1 die, because she only has 1 point in Move. Hopefully it succeeds, or all might be lost.

Step 5: Choose Gilded Actions
When rolling your Action dice, choosing to keep a Gilded die for your final result will refill 1 Drive point. In the image above, the PC’s survey Action is Gilded (represented by the small diamond next to that Action.) Every time this player makes a Survey check, they will choose one Action Die to be different than the rest (a different color, perhaps). Once the dice are rolled, the player will decide which die to keep. If they keep the Gilded one, they would get back 1 Drive point.
This can lead to interesting scenarios. In the example above, the player has 2 points in Survey, and can therefore roll 2 dice. They choose a green die and a yellow die, and designate the yellow one as Gilded. If the roll shows up as a 4 on the yellow Gilded die and a 6 on the green one, then they have a choice to make. Keep the 6, for a complete success, or keep the 4 and get only a partial success, but be able to refill a Drive?
Each character will start with one Gilded Action, depending on the Specialty. You will fill this diamond in, and then choose one more Action to gild as well. You’ll want to choose an Action related to a Drive you have points in, otherwise there will be nothing to refill.
Step 6: Pick Your Abilities
Each character gets two unique abilities—one from their Role and one from their Specialty. You’ll have a few options to choose from in each category, so pick the ones that best fit your character concept.

Step 7: Flesh Out Your Character
Now comes the fun part: bringing your Investigator to life. What is their personality like? What do they believe in? Why? Your character sheet has prompts to help guide you. These will have you think through what drove your character to join the organization, what their style is like, what personal mystery they want to solve. And of course, their name and pronouns.
Candela is a game heavy on inter-party roleplay; having these details determined will help you embody your character more easily.
You’ll also want to review the Illumination Keys at the bottom of the sheet–your objectives for each Assignment. Meeting these will ensure your character’s growth over time. If they don’t fit your vision for the PC, your GM might let you tweak them.
Step 8: Define Relationships
Before you start your first Assignment, you’ll establish your character’s relationships with the rest of the Circle.
Gather all of the players together around a table, or find a Candela Obscura group on StartPlaying.
Each player will write down the names of the other PCs on their sheet under Relationships. Start at the top and choose a relationship type for that first character from a list in the rules. (Such as Bully, Mentor, Champion, Co-worker, Family, and more) and then pick one question under that category, roll for one, or make up your own.

Answer the question for that Relationship, and then move on to the next PC on the list. Continue until your character has a relationship with each other PC.
Then, as a group, you’ll discuss these questions and the answers. Note that each time a player describes a relationship, it is one-sided–it represents how one character feels about another. This does not need to be reciprocated. In fact, it builds more tension and drama in the story when they don’t align. For instance: Silvie might consider the wealthy Jack to be a self-righteous bully who trods on those less fortunate than him. Jack, on the other hand, considers Silvie to be his soul-mate…he just hasn’t been able to tell her yet.
Talk these out and make sure that both players consent to the structure of the relationship. Need an example? Watch Critical Role’s “Creating Characters for Candela Obscura: Tide and Bone” at the 14:26 mark. Aabria Iyengar does an incredible job of walking her players through this process. (Warning: some NFSW language.)
And if you will be the Lightkeeper for your Circle, it is highly recommended that you watch the whole video. It’s a master class in how to set your group’s expectations for a Candela Obscura game.
What’s Next?
And that’s it—your Investigator is ready! Well… almost.
Now that your Circle has its members, it’s time to build the Circle itself. But that’s a topic for another post.
For now, get ready to delve into the mysteries of the Fairelands. Protect the innocent, uncover dark secrets, and trust your Circle—because in Candela Obscura, your next investigation might just be your last.
Krystal has been a Dungeon Master for 7 years and especially works to provide a safe space for women and neurodivergent players to learn and grow.


