


Tabletop gaming has ramped up in popularity as people crave experiences that allow them to be creative, imaginative, and have the opportunity to communicate and collaborate with others in a fun and engaging environment. Having an organized virtual space to gather can give your groups a fun place to hang out before, during, and after the game to build community and camaraderie. As a professional game master with multiple gaming groups, I’ve found that Discord is a fantastic social platform for organizing and keeping in touch with everyone while also keeping them engaged in our stories. Below, I will list some of the keystones to my server that I recommend to keep your players happy and maintain your sanity whilst juggling many groups and their needs.
One Server To Rule Them All
I have a single “community” server dedicated to all of my games and it feels a lot like my virtual home with many rooms and different guests in each one. I use categories and channels to organize activities and topics, and members are allowed to “self assign” roles (more on that later) so they can interact with the channels they feel are relevant to them and hide the channels/topics that are not. This can be set up by going to “Server Settings” and scrolling down to the “Community” category. Once there, you’ll have the option to set up an Onboarding process which will automate the initiation for new members.
Onboarding
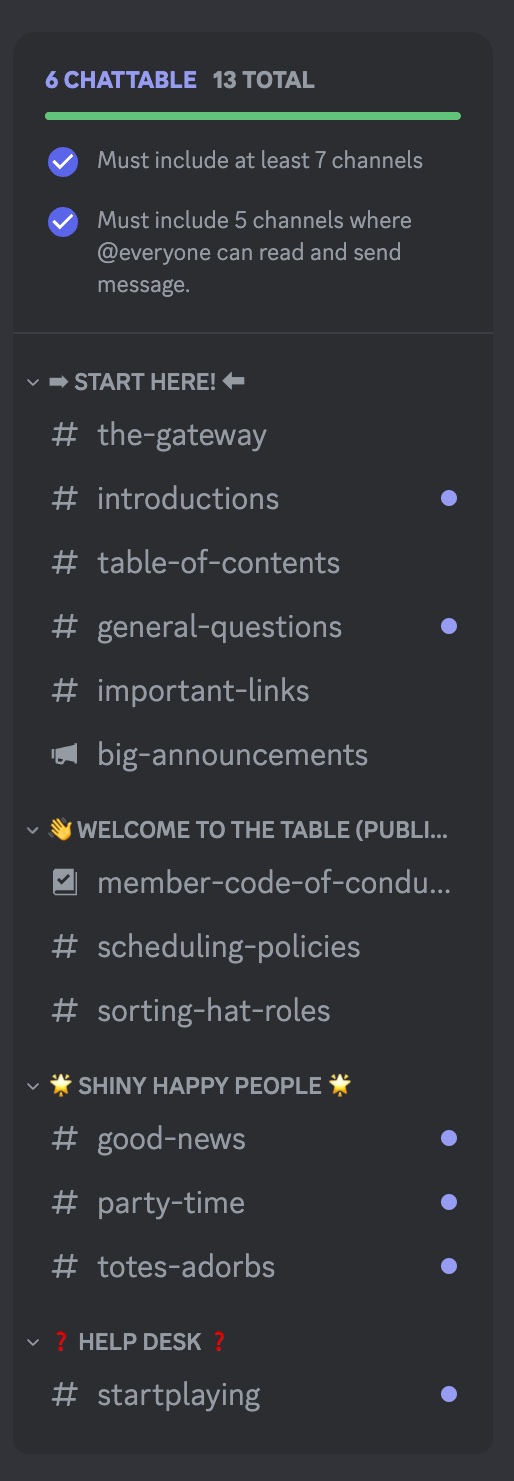
The number one most important thing you can do for your server and your clientele is setting up an onboarding process. As a StartPlaying GM, you’ve certainly been encouraged to attend an onboarding session upon start-up so you can learn the features and best practices of the site and your virtual gathering space is no different! Discord has launched an onboarding feature that is quick and easy to set up from your server settings. The requirement to launch the onboarding feature for new members is 7 “everyone” channels; 5 of which need to allow “everyone” to type/talk (aka “chattable,” as noted by the blue dot next to the channel).
Before onboarding was an option, I set up a rules channel at the top, the introductions channel, a table of contents channel that explains the various channels in my server, a general questions channel, important links (which includes my SPG link, server invite, and socials), announcements, and then I used a reaction roles channel to allow everyone to self-sort. Post-onboarding, I’ve condensed it quite a bit and streamlined it to be quick and painless for my community.
The Basics (* denotes a “chattable” channel)
The following channels are my standard to get started:
- Start Here/Welcome : this is your welcome message channel. No one can talk in here, and it should include some quick tips and/or info that you want everyone in your server to know. I recommend adding a little blurb about how they can adjust their server settings via the “Server Guide” and “Channels & Roles” menu at the top just in case they missed something or need to change their notifications/views.
- Introductions* : make this your default channel that announces arrivals so your server members can welcome them!
- Table of contents : a quick reference guide to your channels/categories.
- General Questions*
- Important Links : I add my StartPlaying gm profile link here, the server invite, and my socials in this space.
- Policies : this channel probably isn’t read very often, but I’m a firm believer in transparency and being able to point to the expectations/terms if an issue arises.
- Announcements
- Memes* or Cute Things* : every good server has a memes/cute things channel, or so I’m told!
- Focused help channels and/or general chat* : I like to keep my “active” members a bit separate from my members who only sign into Discord to play for their game and immediately sign off, so I used some fun channels to fill my 5 chattable channels quota instead of a general “all server” chat. To each their own, just make sure you get to 7 “everyone” channels with 5 chattable or your automated onboarding won’t fire.
Roles
Once you have your channels set up, work up some roles. My onboarding allows a self assigned process, so I have at minimum:
- Onboarded Player
- Onboarded GM
- [Beginner, Intermediate, Advanced] Experience Levels (self-assigned, for my reference, and I have designated forum channels for them to talk amongst themselves)
- Full Community Member (I call this one my “Plays Well With Others Badge” and gives members more channels to interact with)
- A role for each of the games I offer (Warning: DO NOT do this if you want to manage this yourself or keep your groups completely isolated and locked down. Allowing them to self-assign will make it easy to know who is there for which game, but it will also allow anyone in the server to pop into those channels without asking. Alternative option: set up these generic roles and then have specific GM-assigned roles for your “private groups.”
Gaming Groups/Categories
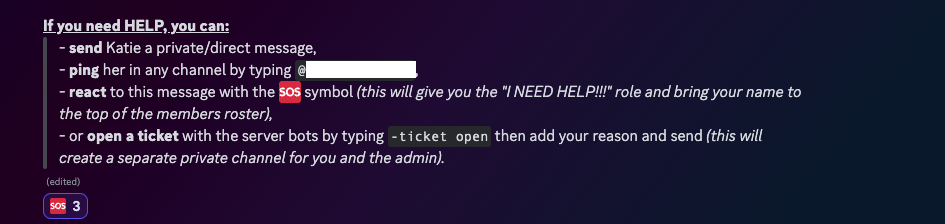
Every server needs a mods/admin channel or two just in case something happens. I put all of my “Moderators Only” Discord announcements in their own category. I use the free versions of YAGPDB and MEE6 bots to auto-mod because I am the only admin in my server, but YAGPDB has a cool “SOS-ticket” option which can come in really handy for your community members. I added an “I NEED HELP” role for this purpose and set it to the top of the roles list so I would see it.
Once you have your onboarding ready to go, set up your game rooms! The rooms I’ve found get the most use/traffic are as follows:
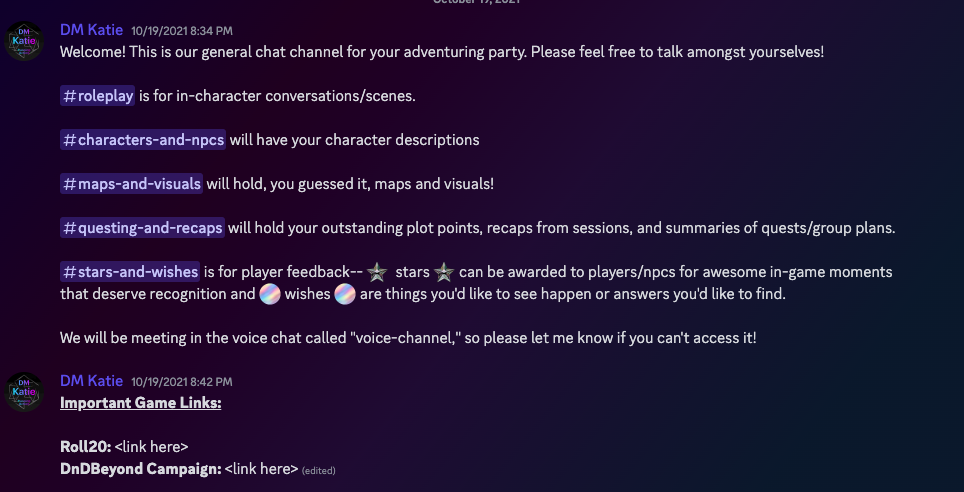
- General Group Chat
- GM-only Channel (for planning, notes, and such—make sure you REMOVE your players’ roles from this so they don’t see your secrets!)
- In-character role-play
- Maps & Visuals
- NPCs/Characters
- Questing & Recaps
- Safety-tools/Stars & Wishes/etc.
- Voice/video channel
I’ve seen many successful servers with only one or two voice channels (a “lobby/hang out” area, the game channel, and maybe a hidden whisper channel or two), but I like to grant my players a private voice channel just for their group so they can hang out with each other whenever they want. I encourage my groups to collaborate often, so they’re welcome to drop in whenever. Some groups use it, some groups don’t, but it’s there if they want it and it doesn’t take much extra effort or work on my end.
Because setting up new groups is a very repetitive and tedious process, I have set aside a “sample gaming category” that only I can see, which has the above channels and the “introductory messages” already in them. I’ve seen bots and such like this one that can set up your channels, roles, and categories in an automated fashion, but I like to give everyone the same info when they join, so I put that in these sample channels and copy/paste them as I add groups to my community.
For example, these are the messages I post at the start of all of my group-chat channels:
When the categories, channels, rules, and roles are set the way you like, pop into your server settings and enable the onboarding. From there, you should be good to go!
If you like these ideas for automating your discord server and wish to incorporate them for your table, use my game master sample server template to get started on your own community or if you already have a server that needs some TLC (not the 90’s girl group, though they’re cool, too), reach out to me and I can help you clean up/organize your current server to save you time and energy as you grow your clientele. Getting your server to run like a well-oiled machine takes some work at the start, but once it’s done, you can spend your precious time engaging with your well-organized community instead of managing it.
Katie is a voice coach/singing instructor and pro GM with over 400 games run on StartPlaying. You can find her @PunningAction or check out her current game schedule on her profile page here.
More from
Game Masters
category


